Showing posts with label Homemade Ingredients. Show all posts

Thursday, April 14, 2011

Homemade Ant Baits

It's that time of the year again!
The time when the spring rains seem to push the ants indoors.  YUCK!
I don't mind ants being outdoors - after all God did put everything on Earth for one purpose or another.
However, they have NO purpose in my home.
                       S  P  L  A  T !
For the past 3 weeks I've noticed an ant here or there in my laundry room ~ no big deal!
I purchased a few store bought ant traps but so far they haven't worked their magic.
So I went to search the internet for a solution and this is what I came up with. *These are the measurements that I mixed together for a small batch.*

Homemade Ant Bait

1 1/2 tbsp. Borax powder
1 1/2 tbsp. sugar
1/4 cup warm water
cotton balls
an old glass or plastic container to mix everything in

Mix first three in container.
Place a few cotton balls in the mixture and let them soak for a minute.
Remove cotton from mixture and squeeze out the excess liquid.
Place cotton balls in places where the ants are being a nuisance however keep them out of reach of children and animals. When the cotton dries out you can submerge them back in the solution, squeeze and reuse.
I have brick on my outer kitchen walls and that is where the ants seemed to be coming from. These cotton balls worked well in those hard to get to areas. I was able to scrunch them up and shove them in between the bricks.
Within one day the ants were gone from my kitchen.
I can't say the same for my laundry room though.
So far I have only used the store bought traps in the laundry area and I still have ants.
So tomorrow I will mix up another small batch and see if that gets rids of them there too!

Friday, January 28, 2011

Winter Hand Scrub - This stuff is great!

Last night I was reading through some of my favorite blogs and I came across a recipe for a hand scrub from Kim over at Life in a Little Red Farmhouse.
I so wanted to try it as my hands get horribly dry and cracked through the winter months. I'm talking so dry that they split open and bleed.
My husband is always telling me that they feel like sandpaper.
My excuse ~ I'm in the kitchen every day doing WORK!
There is never a good time to put lotion on.
I'm constantly in the kitchen preparing meals and would rather not taste lotion in my food.
When I'm not doing that I can usually be found on the computer or working on some sewing.
Again, don't need greasy hands on computer keys or fabrics.
And before you say why not at bedtime....well because I usually take my sewing with me and fall asleep as I stitch.

So this scrub may just be the solution to my dry, cracked hands. I tried Kim's recipe today and then I played around and made up my own concoction.
I put the mixture in a few canning jars and set one right beside the kitchen sink so that it is in sight and I will remember to use it.
So far I've used it twice today and my hands definitely feel softer. It leaves my skin lightly oiled but not so oily that I can't go about my daily tasks of sewing, cooking, computing or whatever else I may be into.

If you'd like to try Kim's Lemon Poppy Seed Scrub then you can find the recipe HERE.

If you want to try my version then here you go.

Brown Sugar Cinnamon Oatmeal Hand Scrub

1 1/2 cups olive oil
1 1/2 cups brown sugar
1 cup white sugar
3/4 cup oatmeal
2 tsp. vanilla
1 tsp. cinnamon

Mix everything together and place in a storage container.
Take a little dab of this into your hands and scrub gently.
Rinse with warm water and then blot hands dry.

 Note ~*I used quick cooking oatmeal this time but I think the next batch that I make I will try grinding the oatmeal into a fine powder.*

It's super easy to make and I think it feels way better than the store bought scrubs that I have used in the past.

Try it !
Your hands will thank you.

Have a great weekend and stay warm!

Tuesday, July 13, 2010

Taking the STING out of Bee Stings


This is the remedy that my mother always used on us when we were growing up and it is the one that my kids ask for when they get stung.

Bee Sting Remedy

Baking Soda
Water

Make a thick paste by mixing a tbsp. or so of baking soda with just a few drops of water. Stir it up with your finger and then apply it to the bee sting area. Leave it on for 5-10 minutes and it really helps to take the STING away.

I keep a store-bought Bee Stick in my medicine cabinet but my kids always ask for the baking soda stuff when they get stung. They say it works better... and one of my kids should know.
Katie has been stung 4 times this summer. It's called STUBBORN!  You would think after the first time she would just give up and put shoes on before she runs outside.

She was stung again the other day and I did finally notice that she IS now putting shoes on before she heads out the back door.
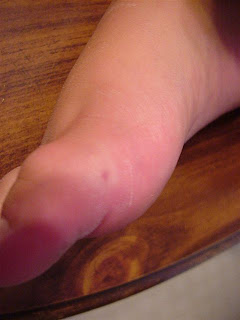
She is obviously allergic to bees because her foot will swell up for 4-5 days after getting stung and the other night she broke out in hives (after being stung) that lasted into the next day. I gave her some Benadryl and watched her closely. Yesterday the hives disappeared and today the swelling seems to be going down.
I wish there was a good homemade remedy for allergic reactions!

Friday, January 29, 2010

Smooth Homemade Applesauce & A Birthday to Share


I've made homemade applesauce many times over the years but it has always been a chunky applesauce that I add a bit of cinnamon and sugar to.

Well this past Christmas I had stopped over to visit my neighbor (who is in her 90's) and when I was there she was preparing a dinner for when all of her family came to visit. At that particular moment she was making homemade applesauce. The only difference between hers and mine was that she was using her food processor to puree it. It made me think instantly of baby food. We talked and I told her that I make applesauce but had never thought of grinding it up like that. She said that is the way her family has always liked it and that it's pretty close to the store-bought jars of applesauce.

Well she's right. I made some just like hers (minus the sugar) and my kids loved it. It's not like it's a new recipe or anything but a new texture that pleased all of my little darlings. I made it again the other day and added a few fresh pears to it. Yummy! If you've never made homemade give it a try. It's quick and easy!
Photobucket


Smooth Homemade Applesauce


6 apples, peeled and sliced
2 pears, peeled and sliced (optional)
1/2 cup water

Place sliced fruit in a pan and add water.
Place lid on pan and let simmer till fruit is soft.
This only takes about 5-10 minutes.
Remove lid and let cool just a bit.
Place fruit in food processor and puree.
My apples were sweet enough so I didn't add any sugar but you can.
Just depends on your taste and how sweet you like it.
The birthday I was talking about is my SIL Crystal over at Fit and Flabless. She probably won't say that it's her birthday today so I'll share that little tidbit with you all. If you visit her be sure to leave her Birthday Wishes!
Happy Birthday Crystal!

Well I better get a moving. I've got a Science lesson/project to do with the kids on matter and molecules. Hope you all have a great weekend.

Friday, January 15, 2010

A Year of Learning


I read Susanna's post the other day about saving money and it made me think of the things that I have learned within this past year~ ways to cut back and make-do with what we have.

This past year has proven to be a tough year financially for many of us and it has prompted us to look for any and all ideas to reduce our spending. Some reductions have come easy while others have been a little harder to swallow.

Here are just a few ways that I have been able to cut back and reduce our costs.

1. From-Scratch Cooking ~ I have always cooked "homemade" but I have added many basic recipes to my files this year like canned milk, bread, biscuits, syrup, Play-Doh, pizza dough, chocolate syrup, etc.) It doesn't seem like a lot but when you add it all up then I HAVE saved money as well as cut back on the "garbage" additives that we consume from store-bought products.

2. Reduce electricity by hanging laundry out to dry, turning the heat back a notch and shutting TV's and lights off when not in use. ( The last one applies mainly to the kids who will just walk away leaving everything on.)

3. As I said above, I hang as much laundry as I can outdoors to dry.

4. Using homemade cleaning products that work as well if not better than the store-bought. (You'll have to click on the link and then scroll down to see the recipes I use.)


One other store-product that I have really cut back on is fabric softener. With a family of five our laundry costs can be a big expense (water bill, electricity, detergent & softner) but I've been able to cut back again by diluting fabric softeners. (I'll have to let you know just how many months this one bottle of softener lasts me when it's all gone.)
Photobucket
This photo is the corner where I keep my homemade laundry detergent stored (in bottom bucket) and my diluted fabric softener ( in Folger's can) along with a towel for any clean-up.

Normally during the summer months I don't even use any softener in my laundry. I just let the wind beat the wrinkles and stiffness away. (Though a few fabrics do get brought back in and fluffed for a few minutes in the dryer.) During the winter months though, STATIC is my main battle so I do use a softener. I have shared this tip before but I'm going to share it again because I've been using it for a good while and really like it.

Items Needed:

~Plastic coffee can or other container with a lid
~Liquid fabric softener
~1 Old washcloth
~1 hand towel


Place 1/2 of liquid fabric softener in coffee can.
Fill coffee can the rest of the way up with water.
Cut wash cloth in 1/2 & place in coffee can.
When drying a load of clothes in the dryer I take one of the washcloth pieces & wring it out well. I then toss it in the dryer with my clothes and start the dryer. ( This can be messy so I leave a handtowel near to wipe my hands on.)
When the clothes are dry I toss the dried washcloth piece back in the softener can till I need for the next load.
My clothes come out soft and without static.

As I use up the softener in my can and it reaches the 1/2 way mark I simply refill it to the top with water again.

Like I said, I have been using this method for a good while and am still on the original bottle of store-bought softener.


I really hope our economy begins to improve this year and we can begin to live a little easier. However, I plan to continue using the lessons I've learned this past year to live a little greener, healthier and simpler and hopefully to save a little more "green".

Enjoy your Weekend!

Thursday, November 19, 2009

Recipe Conversions Made Easy


I have this handy little list hanging on my refrigerator and it gets used all the time.

There are so many home-made - "from scratch" recipes that I use that call for oddball measurements.

Or maybe that is me making some oddball recipes.

Hmmm... not sure!


Anyways with this little cheat sheet I can easily adapt any recipe ingredients to fit our needs.


1 cup = 8 oz. OR 16 tbsp. OR 48 tsp.

3/4 cup = 6 oz. OR 12 tbsp. OR 36 tsp.

2/3 cup = 5 oz. OR 11 tbsp. OR 32 tsp.

1/2 cup = 4 oz. OR 8 tbsp. OR 24 tsp.

1/3 cup = 3 oz. OR 5 tbsp. OR 16 tsp.

1/4 cup = 2 oz. OR 4 tbsp. OR 12 tsp.

1/8 cup = 1 oz. OR 2 tbsp. OR 6 tsp.

1/16 cup = .5 oz. OR 1 tbsp. OR 3 tsp.


I know that most cookbooks have these listed inside but if you are like me then you don't want to have to go searching for them while you are in the middle of cooking. That is why I keep them on the refrigerator. You could also print them out and then hang them on the inside of a cabinet door so that they are out of sight yet at your fingertips when needed.


Hope you all have a great day!

Wednesday, May 13, 2009

Homemade Window Cleaner


Here is a new window cleaner that my SIL Joan passed on to me. Her recipe called for Vodka but I didn't have any so I just used rubbing alcohol and it worked. This one didn't produce the awful streaks on the glass like some of the other ones did. Oh, if I remember right she said you could use a squirt of blue food coloring to make it look like Windex but I chose not to.


Homemade Window Cleaner


Empty Windex Bottle (or any bottle)

2 tbsp. Vodka or rubbing alcohol

4 tbsp. ammonia

Water


Pour alcohol and ammonia in bottle.

Fill the rest of the way up with water.

Happy Cleaning!

Wednesday, April 22, 2009

Homemade Cleaning Products


I have been reading many articles on homemade cleaning products and decided I'd give them a try. Here are a few that I have tried and really like.


#1. I have been making my own laundry detergent for almost a year now and I love it. It takes a little time to make but it definitely saves me money. You can find out how to make your own by looking under cleaning recipes on my sidebar.


#2. Alice's Wonder Spray is an all-purpose cleaner recipe that I found over at Tammy's Recipes. I mixed a bottle of this up for everyday use but I also mixed a large batch of it up and used it to scrub my walls down with a few weeks ago. It worked well on the little fingerprints on the wall. :)

1/4 cup white vinegar
1 tbsp. borax
3 cups hot water
squirt of dish soap
32 oz. spray bottle
Mix the vinegar and borax in the bottle. Fill with hot water and shake to dissolve the borax and then add the dish soap. (This is the blue bottle that is in the photo.)


#3. Floor Cleaner
Here is what I mixed together the other day to scrub my linoleum floors and it worked well.
1/4 cup borax
1/4 cup baking soda
1 1/2 cups vinegar
hot water
Add the borax, baking soda and vinegar to a scrub bucket. Let it bubble up for a minute and then fill the bucket the rest of the way up with hot water.


#4. Homemade Fabric Softener Sheets

My sister-in-law Joan passed this on to me (It's the milky white substance in the photo.) and here is how I made mine.
Take a coffee can or other container of about the same size.
Add 1-2 capfuls of store bought liquid fabric softener to the container and then fill it the rest of the way up with water.
Next I took two old washcloths and cut each one in half giving me a total of 4 strips. Place those in the liquid.
Now when I dry a load in the dryer I just open my container and pull out one or two strips and wring them out good. Toss them in the dryer with the clothes and turn dryer on. When clothes are dry I take the strips out and toss them back into the coffee can for the next load. I have just started doing this within the past month but can already see that it is saving money and it does make my clothes soft and static free.
**I purchase a lot of these cleaning ingredients in bulk so that I always have enough on hand. I buy the Borax and vinegar at Walmart. The baking soda I buy in big bags at Sam's Club. **


Tuesday, March 17, 2009

Homemade Evaporated Milk

HAPPY ST. PATRICK'S DAY!!
I was making my favorite cake the other day, which is an Oatmeal Cake, and half ways through mixing it I realized I was out of canned milk. I'm talking about evaporated milk. I had no way a getting to a store so I looked through my recipe basket and found a recipe that I had saved some time ago but had never tried it. As it turns out, my head must have been elsewhere because I had grabbed the recipe for SWEETENED condensed milk instead of evaporated milk. Needless to say I ended up making both recipes and can now tell you that both DO work.
I don't think I'll be buying the store bought version of either one anymore. Not when I can make my own from scratch.


Evaporated Milk
1/3 cup nonfat dry milk powder
6 tbsp. water
Mix well.
This is equivalent to 1/3 cup of canned milk.
-----------------------------------------------------------
Sweetened Condensed Milk
1 cup boiling water
1 stick butter
2 cups sugar
2 cups powdered milk
Bring water and butter to a boil & butter is melted.
Remove from heat and add sugar & milk.
Blend. ( I used my mixer to do this.)
I'll share the Oatmeal Cake recipe with you tomorrow!

Sunday, October 26, 2008


Homemade Laundry Detergent

I try to find small ways to cut costs and this was one of those ideas that I just wasn't sure that I would like. However, after several months of making my own soap and using it daily in our laundry I can say that I really like it and it DOES save me money. I have also tried the liquid version but have found the dry to be much easier to store. To get started you will need a bucket or container with a lid, a cheese grater, food processor, Borax, baking soda and Ivory bar soap.


1. Grate a 4.5 oz. bar of Ivory soap on cheese grater.
2. Place the grated soap in the food processor & add 1 cup Borax and 1 cup baking soda.
3.Process several times till you get a fine powder.
4. Dump the powder into your storage container.
5. Repeat this process until you have the desired amount of detergent.


I use 1/4 cup for a large load of clothes and if they are extra dirty then I use 1/3 cup.


I usually get my bar soap at the Dollar Stores for $1.00 per bundle and pick up the rest at Walmart. I make 9 batches at a time and it costs me approximately $10.00 and will last me for a month to a month and a half.